
I have to admit that I have not been doing much hobby related recently. I have had some things on the painting/building table though. As the father of a three and a half year old, both Halloween and Legos have been big all around the house lately, including in my hobby/music room. I figured that since those things have taken up time and space in my hobby room, they might as well take up some time and space on my blog… so here we go!
First up are the Legos… As I said in my previous post about Legos, I have recently gotten a bit into the AFoL scene thanks to my little boy. He wants ALL Legos, but I only collect things that I find “cool” for one reason or another. My first three sets were the original Ghostbusters Ecto-1, the Scooby Doo Mystery Machine, and the set of The Big Bang Theory. Following in the vein of things that I find cool and interesting, I recently picked up a couple of Star Wars Lego sets. The first of those sets that I decided to build a couple of weeks ago is the R2D2 and C3PO, Droid Escape Pod set from the first film.

This was a fairly simple and fun set to build, and as far as Star Wars Lego sets go, it was pretty reasonably priced at about $25. It includes R2D2 and C3PO minifigures, as well as two Jawa minifigures. It also includes the escape pod itself which is a neat little piece. The pod has lots of neat details, plus it opens up to display an area where C3PO and R2D2 can control the pod as it flees the Star Destroyer.


The build was fairly easy and straightforward. I believe it only took me about 30 minutes to put together, and that includes being distracted by my son who was very determined to play with R2D2 and C3PO while I was working…
Anyway, I look forward to building more sets with my son and will continue to make more posts and we build more sets.
Next up was my first ever attempt at making a Halloween costume from scratch. Over the last few months, my wife and I have been asking our son what he wanted to be for Halloween. As most three and a half year olds do, he changed his answer ever time he was asked… until about a month ago. Right about then he started saying pretty consistently that he wanted to be a “choo choo train.” Well, I started looking at train costume options online, and as you might expect, there really aren’t many decent options for off-the-shelf train costumes. After looking at some homemade costumes, and going over some ideas in my head for about a week, I decided that the skills I have picked up over years of building terrain had to be transferable to making Halloween costumes. As luck would have it, I was right! Almost all the homemade train costume images I could find were Thomas the Tank Engine costumes, so I went with that so I could use the images I found as a guide.
The first thing I did was go and buy several sheets of foam core. I decided to use foam core because it is very lightweight, and I am very familiar with building with it. I had an idea about how I wanted to build things, but not having made a costume before, I did not really have any basis for comparison on size of pieces, so I did things visually. I had my son stand in front of me, and I just started measuring him and then drawing things out on the foam core. Then I held the foam core up to him and made a few adjustments that I decided were needed to make things fit his body. Once I was happy with the individual pieces, I started cutting. As I do with terrain, I used white glue to join all the pieces together. This is what I had on that first day.
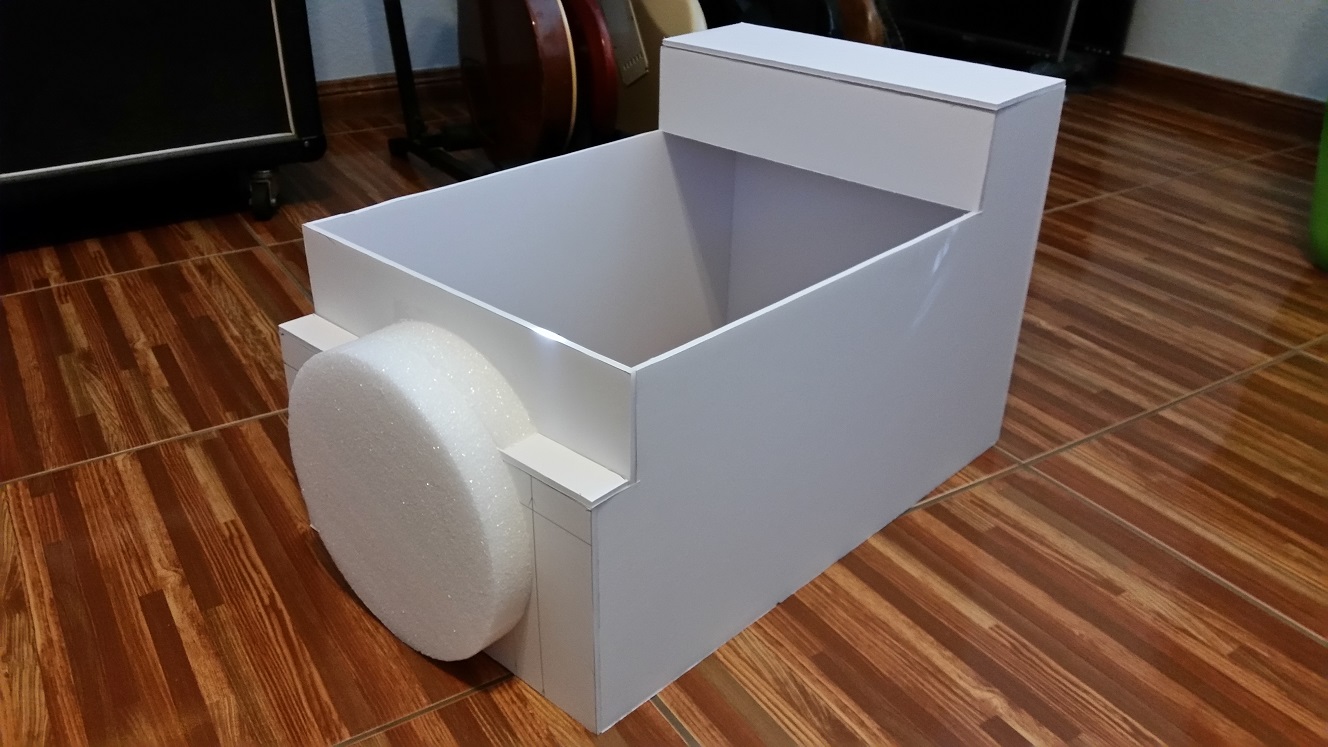
The circle on the front is just two pieces of circular styrofoam, trimmed and glued together for the face of Thomas the Tank Engine. I decided early on that I did not want the seams to be too obvious, so I used some spackle to fill in the gaps, then sanded them down to make them as smooth as I could. After that it was time to start painting. I went to Home Depot and found a spray paint that was as close as I could find to Thomas the Tank Engine blue. In order to keep the spray paint from melting the styrofoam pieces, I used the old trick of painting the foam with watered down glue first. After that, spray painting was pretty quick and easy. Then I brush painted the top piece black, and did the details of the face.
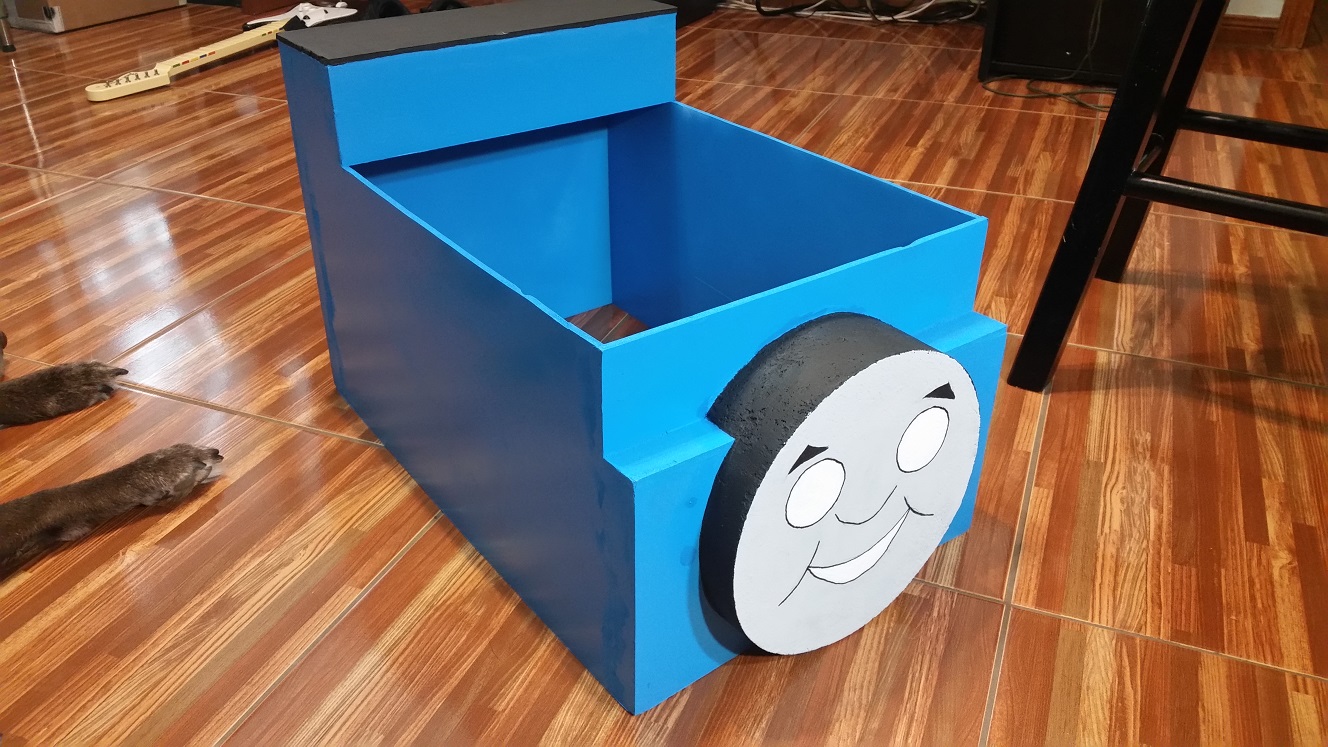
Then I added a small toilet paper tube for a smokestack, and started painting on window details.

The pupils of his eyes were actually traced 30mm mini bases. You use what you have…

The wheels were actually traced from the bottom of my new Bugman’s Bowl mug trophy, because it was the perfect size. To get the spoke pattern as uniform as possible, I actually did the old paper snowflake trick. I cut a piece of construction paper into a circle, then folded it over a couple of times. Then, I cut a spoke pattern out, unfolded the paper, and laid it on top of the wheel and traced the pattern out.
At this point, it was time to start working on some aesthetic details. Thomas the Tank Engine has some red line details that I spent a bit of time trying to decide how to replicate without spending a TON of time hand painting everything. I thought about maybe hot gluing some red ribbon on the sides, but my wife did not have any spare ribbon laying around. I considered and rejected yarn, pipe cleaners, and a couple of other things. The simple solution came to me as I was leaving work on Thursday and I happened to look over and see a role of red tape sitting on top of a filing cabinet. Seeing that tape, I remembered that I had a roll of red electrical tape at home. When I got home, I grabbed the tape, went straight to my hobby room, and started laying things out. It worked out, but it probably would have been better if the tape had been red masking tape, or strips of red gaffer tape. The electrical tape did not stick to the painted sides of the train as well as I had hoped, and so I had to super glue just about every corner down. It is still better than having to hand paint all those lines…
After that I just added a yellow “1” to each side of the train body, and made some straps to hold the costume up and decided that it was time to call it done.

Astute observers will notice that there are several details missing from this costume. I could have easily spent several more days making the costume more accurate, but I decided that spending all that extra time adding those details would not really matter to my three and a half year old, at all. He loves it just how it is, so that is good enough for me.
That is it for tonight. Since a reader commented on a previous post that he would really like me to finish my abandon Mordheim terrain tutorial series, I will finally stop putting off completing that project and work on that over the next week or so to finish it. Finishing the tutorial will likely be my next post, unless I decide to post a review of Nuffleween next weekend…
