
So, a while back, someone asked me to do a terrain tutorial. I have never done a tutorial of any kind before, so this will be a little bit of an experiment for me. I will try to explain each piece as best I can, but if I manage to skip anything, or if there is anything anyone does not understand, just post a comment, and I will explain further. One of the things that I love about wargaming terrain, is that there is really no one right way to do anything. There are almost as many ways of making terrain, and styles as there are people who make terrain. What I am about to show you is not the only way to make terrain, by any stretch. It is just how I do it. I also learn something new with almost every terrain piece, so the way I show you to make terrain in this tutorial may not be the way I make terrain a year from now. Whow knows… Well,on that note, on with the tutorial.
The first thing you need to build terrain is tools and materials. This is, by now means, an exhaustive list, it is just what I use most often.
Tools:
Hobby Knife
Various Pliers
Razor Saw
Rulers/Straight Edge (multiple recommended)
Rotary Tool (recommended)
Pin Vice (recommended)
Jigsaw (recommended for basing)
Supplies:
Foamcore
Balsa Strips (Various Sizes)
1/8 Inch Sheet Balsa
Craft Matchsticks
Craft Popsicle Sticks
White Glue
Lego Windows (recommended)
Stucco Patch
Cheap Acrylic Paints
Cereal Box Cardboard
1/8 Inch Hardboard/Fiberboard (for basing)
Imagination
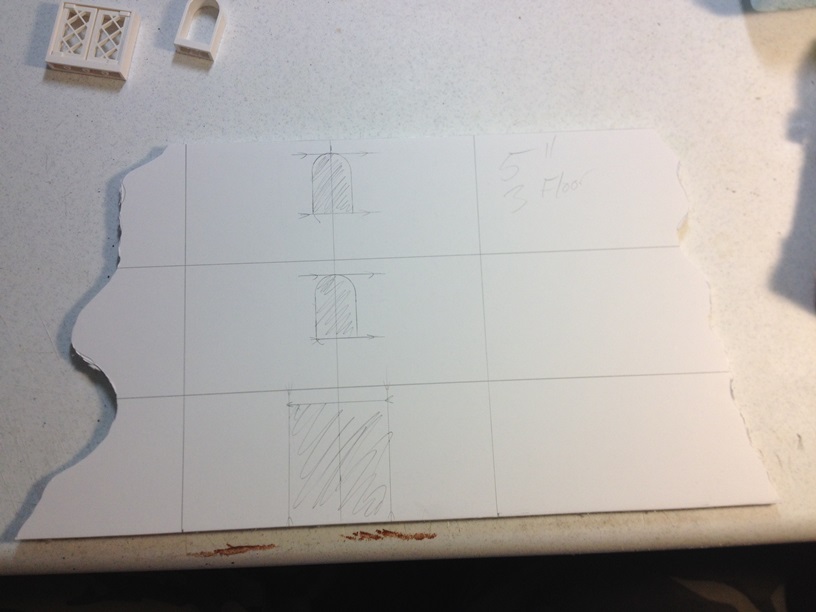
Building a piece of terrain always starts with an idea. My ideas come from various places, movies, pictures, other pieces of terrain… lots of different sources. In the case of this particular piece, I was watching the movie, A Knight’s Tale, and I liked some of the buildings I saw in the set pieces. They inspired me to get up and make a new piece, and here we are. The idea for this piece is for three seperate “buildings” all attached together as a single piece. I did not want each section to be identical with the others, because that is just boring. As I thought about it, I decided that two of the three buildings would be three floors, and the third would be two floors. It made sense to put the two taller pieces on the outside, and place the shorter piece in the center. I also wanted to play with widths a little, so the left outer pieces would be five inches wide all the way up, the center piece would be four inches wide, and the right piece would start at four inches, and step outward to five inches on the second floor.
I start with a sheet of foamcore. I have a two inch wide, yard long straight edge that is perfect for measuring out floors. I use the Games Workshop standard of two inches per floor. So, I lay the straight edge down and draw a bunch of two inch wide lines across the foamcore sheet. With that, all my floors are already measured out. Easy peasy.
Next, I measure out the length that I want each wall to be. We want good, full access to as much of the building as possible for playing purposes, so we are only going to make three of the four walls. We will draw all three walls as one piece. When we measure the walls out, we will make each wall seection 3/8 of an inch shorter than however long we want our outside measurements to be. I will explain why shortly. Once measured and drawn out, we cut them out with a hobby knife, like this:

Sorry, but I never got a picture before cutting the whole piece out.
Before I do any further cutting, I like to decide on, and draw out my windows and doors. For ease of building, I like to use Lego windows. They look good, are the right size, can be ordered directly from the Lego website, and are super cheap. Decide on where you want to place them, and you can then just trace out the windows onto the foamcore:


Once we have all of the window and door placement figured out, and drawn on, go ahead and cut them out.
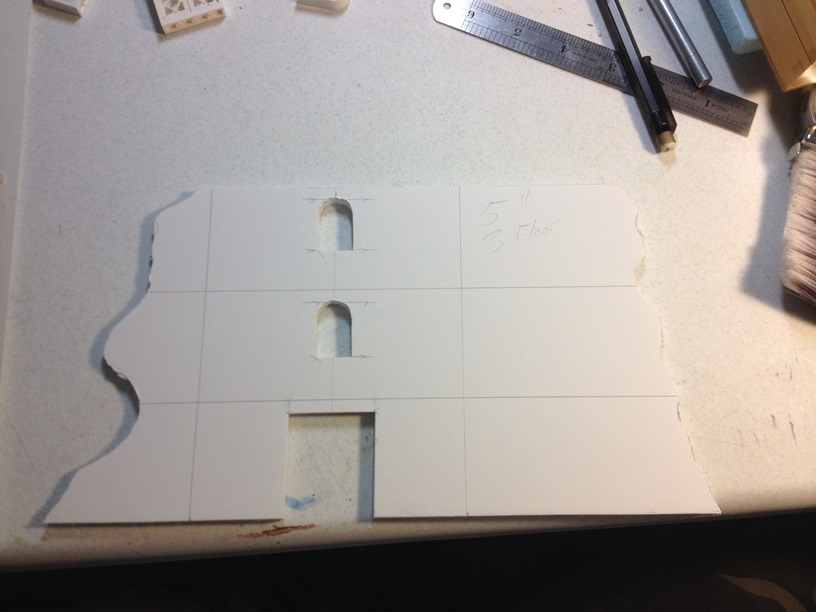


Now, we are ready to cut the individual walls. What we are going to do here, is cut through the first layer of paper along our wall lines, and about halfway through the foam, leaving the second paper layer completely intact. By doing this, we can just fold the walls around, while keeping them attached to each other. This makes assembling the buildings much easier than if the walls were completely seperated. This is also why we made each wall section 3/8 inch shorter than our desired outer wall dimensions. We have to account for the width the foamcore itself adds to the wall dimensions once folded outward. Foamcore is about 3/16 of an inch wide, so if you count one folded section on each side, that adds 3/8 inch to the overall wall length.

Basing. Now, there are two schools of thought on terrain basing. Some like no bases at all so that all of their terrain sits directly on any table style with no aesthetic irregularities. Others, like me, prefer to make bases for their terrain for various reasons, including increased stability. If we want to make a base, now is the time. We draw the dimensions of the building floor out, and add 1/2 inch all the way around our outer dimensions.

Once everything is drawn out, cut the base out with a jigsaw. We do not have to worry about our cuts being perfect, as we are going to rough up the edges later anyway, to simulate a more natural look.

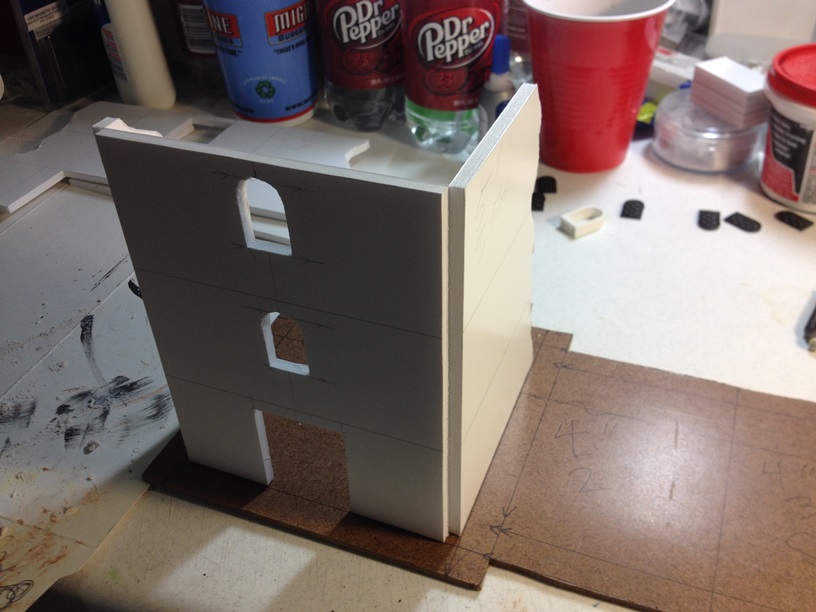
Once the base is cut out, we can glue our wall pieces down. We can use superglue for immediate adhesion, or we can use white glue if there is no superglue. Foamcore actually adheres using white glue VERY quickly, so it is almost as good as superglue. If our measurements are good on our base, we should be able to line our walls up almost perfectly using our measurement lines for gluing.
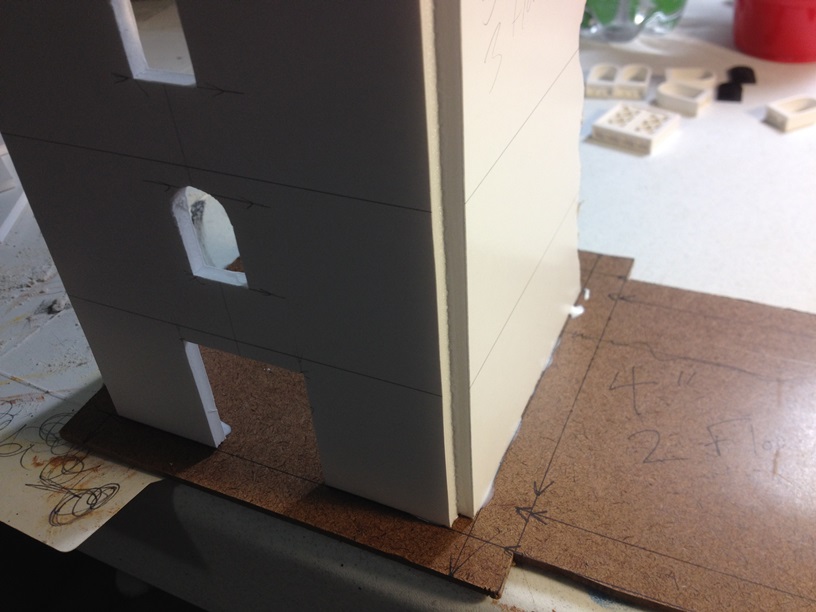
Since this particular piece has mulitple wall sections, we will go ahead and place the rest as well.


This is probably a good stopping point for the tutorial. I will post part two in the next day or so. If you like the tutorial so far, great! If you would like more, or less, of anything in particular, please let me know in the comments.
Thanks for reading,
Mike

Excellent tutorial so far. I look foward to the next part. The Lego windows are a good idea and I really like the general outline of your built.
LikeLike
thank you very much! I have never even attempted a tutorial before, so I didn’t know if I was over doing it, under doing it, or just plain sucking all together at it. I tend to ramble and get side tracked, so I was really working to stay on point. lol
LikeLike
Pingback: Mordheim Terrain Tutorial – Part Deux! | Mike's World
Pingback: Mordheim Terrain Tutorial – 666: The Number of the Terrain! | Wyrd Stones and Tackle Zones